Andrew Thompson
Western Thunderer
This is an old project that has had a 40 year gestation period.
When I was a lad in the late 60s and early 70s this was the one engine that eluded me and then was shipped off to Russia so that was that.
When I started in O gauge in the mid 70s, I promised my self I would build a model of the said loco, which would have to be scratch built as no kit existed and doesn't to this day.
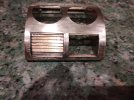
My intention was to built it from brass and to this end in 1978 I purchased a spare brass class 47 body from DJ Parkins for the princely sum of £12. This was hacked about (which I still have.) A start was also made on the cabs.(see photos)
The cab roofs put a stop to progress and the need to create all the roof details.
To cut a long story short it got put on to do shelf as other projects took precedent.
Coming upto date about four years ago as technics had improved namely 3d printing and drawing packages.
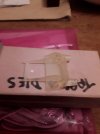
A member of my local club had become very proficent at 3d printing and agreed to draw and print the cabs.In the event he did the 3d drawings and then these were printed by shapeways.
I drew up plans to have all the roof details etched.Unfortunately the plans to etch the roof details didn't come to anything.
However the 3d printing was completed and was the spur to resurrect the project.
A review of how I could get this loco completed led me to build the main body and roof details from plasikard.
Progress is as follows :
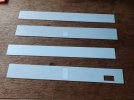
Main body is wood with plasikard laminates to create three laminates.
The roof is based on formers with stringers to form the basic shape. This was then sanded down and a 10 thou skin stuck down.
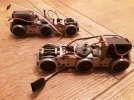
I had acquired two abc motors chassis from a previous 47 which will be used to power the loco.
Also acquired over the years are some up graded class 47 bogie kits that i need to find. In the attic stash away.
As you may or not be aware the orginal bogies were exchanged for class 47 bogies later in its career .
I think thats enough for now.


When I was a lad in the late 60s and early 70s this was the one engine that eluded me and then was shipped off to Russia so that was that.
When I started in O gauge in the mid 70s, I promised my self I would build a model of the said loco, which would have to be scratch built as no kit existed and doesn't to this day.
My intention was to built it from brass and to this end in 1978 I purchased a spare brass class 47 body from DJ Parkins for the princely sum of £12. This was hacked about (which I still have.) A start was also made on the cabs.(see photos)
The cab roofs put a stop to progress and the need to create all the roof details.
To cut a long story short it got put on to do shelf as other projects took precedent.
Coming upto date about four years ago as technics had improved namely 3d printing and drawing packages.
A member of my local club had become very proficent at 3d printing and agreed to draw and print the cabs.In the event he did the 3d drawings and then these were printed by shapeways.
I drew up plans to have all the roof details etched.Unfortunately the plans to etch the roof details didn't come to anything.
However the 3d printing was completed and was the spur to resurrect the project.
A review of how I could get this loco completed led me to build the main body and roof details from plasikard.
Progress is as follows :
Main body is wood with plasikard laminates to create three laminates.
The roof is based on formers with stringers to form the basic shape. This was then sanded down and a 10 thou skin stuck down.
I had acquired two abc motors chassis from a previous 47 which will be used to power the loco.
Also acquired over the years are some up graded class 47 bogie kits that i need to find. In the attic stash away.
As you may or not be aware the orginal bogies were exchanged for class 47 bogies later in its career .
I think thats enough for now.


)")
")