7mm A little detailing of RTR locos and wagons

Pannier 7400
  • bernd lachmund

    Active Member
    Hello,

    thanks to welcome me Pete. And John and Jordan in German ! John, have a hopefully good time in Germany next month!!


    And many thanks for the "likes"!

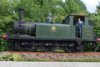
    As with all my GWR locos the Pannier 7400 has got the fascinating prototypical brake use by pressing the function key with the brake sound. It`s because all of them are fitted with Zimo decoders. I`ve got some German Lenz locos and there the locos get only slower by reducing speed through the controller.
    The Lionheart Pannier has got very good running qualities especially at low speed!!
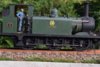
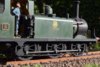
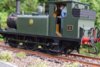
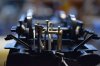
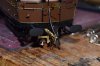
    What I didn`t like so much was the look of the cacuum pipes and so they were exchanged against Laurie Griffin ones. Then the hooks for the couplings at rest were made from 0,3mm brass wire. Further on I connected the loose ends of the pipe below the front buffer beam( sorry, but don`tknow what it is for) by using 2 small parts of wire insulation and 5mm brass wire. Again I fitted small parts of chain to the heating pipes. (By the way the figures in the cab are from "Detailed miniatures" and I think they have got fantastic looking O gauge figures.) A bit difficult was the reducing of the rather broad rim of the bunker by filing it a bit sloping and though it still looks ( in contrast e.g. to brass locos) too broad I simply didn`t risk to go further. I filled the bunker with real O gauge coal. The head lamp is from Laurie Griffin with some changes. I used 0,3mm brass wire to replace the handle( two parts) and filed the left side flat. On this side I fixed a small part of a brass L profile to make it fit to the lamp irons.

    Regards
    Bernd
    Bernd
     

    Attachments

    • DSC_0216_01.JPG
      DSC_0216_01.JPG
      185.6 KB · Views: 248
    • DSC_0211_01.JPG
      DSC_0211_01.JPG
      108.4 KB · Views: 244
    • DSC_0214_01.JPG
      DSC_0214_01.JPG
      115.7 KB · Views: 244
    • DSC_0209_01.JPG
      DSC_0209_01.JPG
      157.2 KB · Views: 249
    • DSC_0208_01.JPG
      DSC_0208_01.JPG
      195 KB · Views: 244
    • DSC_0215_01.JPG
      DSC_0215_01.JPG
      190.3 KB · Views: 245
    • DSC_0217_01.JPG
      DSC_0217_01.JPG
      134.9 KB · Views: 246
    • DSC_0218_01.JPG
      DSC_0218_01.JPG
      82.9 KB · Views: 246
    • DSC_0219_01.JPG
      DSC_0219_01.JPG
      125.8 KB · Views: 246
    Last edited:
    Terrier A1X Portishead, shortly after being purchased by GWR
  • bernd lachmund

    Active Member
    Hello again,

    comparing my Dapol Terrier with prototype photos I was a bit disappointed as the vents on the tanks were missing on the model, though the Terrier had them until being condemned. Another important detail were the condensing pipes that were still there on a prototype photo from 1948. So I decided to model these details and others to show the Terrier as if it was purchased from Weston , Clevedon, Portishead Railway by GWR only shortly before. As DCC supplies didn`t have any spares I needed any more, I searched for substitution and found the vents and Westinghouse pump with Roxey mouldings , the different Vacuum , heating , airpipes with Laurie Griffin and Warren Shepherd. Condensing pipes are 1,5mm copper wire , their fittings on tanks and front boiler are wheels from a sack barrow kit. The pipe from cab to left front boiler , parallel to handhold is 1mm brass wire. As the fittings of the vents was modelled on the tanks, I had to cut off the bases of the Roxey vents and then to lengthen them with plasticcard. Hope I didn`t forget anything! And in advance , sorry for any wrong English words /expressions!

    Regards
    Bernd
     

    Attachments

    • DSC_0199_01.JPG
      DSC_0199_01.JPG
      250.2 KB · Views: 217
    • DSC_0205_01.JPG
      DSC_0205_01.JPG
      253.5 KB · Views: 217
    • DSC_0210_01.JPG
      DSC_0210_01.JPG
      252.8 KB · Views: 217
    • DSC_0212_01.JPG
      DSC_0212_01.JPG
      270.4 KB · Views: 213
    • DSC_0213_01.JPG
      DSC_0213_01.JPG
      202.7 KB · Views: 216
    • DSC_0214_01.JPG
      DSC_0214_01.JPG
      172 KB · Views: 211
    • DSC_0215_01.JPG
      DSC_0215_01.JPG
      245.7 KB · Views: 211
    Pannier 7400 changed to 6430
  • bernd lachmund

    Active Member
    Hello again,

    I bought the Lionheart 7400 Pannier as one of the last of the Lionheart range to get.( detailing above in the thread) It was my first British loco and I must confess it was really a very convincing purchase , especially compared to the running qualities of my German Lenz locos. As I had bought a DCC model I looked for a sound decoder and got the Zimo MX645R and fitted an SC68 stay alive capacitor as well. "Keith the Soundguy" helped me with the right soundfile and to use "Real Drive" with my Pannier, what is really an impressing function as it makes prototypical driving much more realistic! Later I found out the differences between 64xx and 74xx Panniers and was fascinatined at once with the autotrain function of the 64xxs. So at last I decided to transform my 7400 to a 64xx , keeping in mind the main difference between the 64xx and the 74xx , the curved join between bunker and cab of the earlier 64xx in contrast to the sraight one of the 74xx. So I chose 6430 ( a heritage loco at the same time) and with HMRS transfers, PeterRoles`autogear castings, Severnmillsnameplates I tried the change.
    (Only slightly weathered as in 1937 quite new condition)

    Bests
    Bernd
     

    Attachments

    • DSC_0289_01.JPG
      DSC_0289_01.JPG
      229 KB · Views: 143
    • DSC_0291_01.JPG
      DSC_0291_01.JPG
      195.1 KB · Views: 144
    • DSC_0292_01.JPG
      DSC_0292_01.JPG
      161.8 KB · Views: 140
    • DSC_0293_01.JPG
      DSC_0293_01.JPG
      182.7 KB · Views: 139
    • DSC_0295_01.JPG
      DSC_0295_01.JPG
      212.1 KB · Views: 139
    • DSC_0296_01.JPG
      DSC_0296_01.JPG
      210.3 KB · Views: 138
    Ixion Fowler Diesel Shunter
  • bernd lachmund

    Active Member
    Hello,
    I´d like to show some photos of my slightly weathered Fowler shunter with added buffer flanges which aren`t on the Ixion model , but on the prototype. I realized them missing by getting to David L.O. Smith`s website by chance. Besides other fantastic model improvements of different railway models, he had changed a lot of details on the Fowler. After having asked him, he was so very kind to send me some as an exception. In addition , as seen there , too, I exchanged the square coupling links for round shaped ones.

    Bernd
     

    Attachments

    • DSC_0342_01.JPG
      DSC_0342_01.JPG
      237.7 KB · Views: 274
    • DSC_0343_01.JPG
      DSC_0343_01.JPG
      220.2 KB · Views: 273
    • DSC_0344_01.JPG
      DSC_0344_01.JPG
      228.9 KB · Views: 272
    • DSC_0340_01.JPG
      DSC_0340_01.JPG
      235.1 KB · Views: 277
    Minerva Mink van
  • bernd lachmund

    Active Member
    Hello after a while,

    I`ve tried to correct two small "mistakes" at the Mink van , mentioned on RMweb. 1. The flush rain strip above the doors made a little bit prominent by using a 0,5mm thick and 1,5mm wide plastic strip. 2. The missing spring stop made from 2mm U profile and tiny plastic strips glued to it.
    I`ve taken the example photos from RMweb hoping it isn`t a problem?
    Regards Bernd
     

    Attachments

    • post-133-0-38979100-1504364310.png.jpg
      post-133-0-38979100-1504364310.png.jpg
      10.5 KB · Views: 246
    • minerva-mink-box-and-spring.png
      minerva-mink-box-and-spring.png
      113 KB · Views: 249
    • DSC_0378_01.JPG
      DSC_0378_01.JPG
      96.1 KB · Views: 248
    • DSC_0377_01.JPG
      DSC_0377_01.JPG
      154.6 KB · Views: 250
    • DSC_0379_01.JPG
      DSC_0379_01.JPG
      146.1 KB · Views: 244
    GWR autotrailer fitted with auto train gear
  • bernd lachmund

    Active Member
    Hello,

    first of all many thanks to John Taylor who showed me the Orion railways castings for detailing the RTR autocoach and in addition for sending me a long email with a very relevant informative article in the Model Railway Journal. I`m also thankful to Jerry Colebrooke sending me the castings and giving me some further information. To know a bit more about the diagram N autotrailer and the autogear apparatus I bought John Lewis book: "Great Western Auto Trailers P.1.
    Here are some photos of the fitted model and when having finished the underframe wires and coloured the castings I`ll perhaps take some more.

    Regards
    Bernd
     

    Attachments

    • DSC_0443_01.JPG
      DSC_0443_01.JPG
      121.3 KB · Views: 209
    • DSC_0445_01.JPG
      DSC_0445_01.JPG
      121.1 KB · Views: 206
    • DSC_0456_01.JPG
      DSC_0456_01.JPG
      120.4 KB · Views: 199
    • DSC_0453_01.JPG
      DSC_0453_01.JPG
      127.5 KB · Views: 203
    • DSC_0450_01.JPG
      DSC_0450_01.JPG
      176.2 KB · Views: 206
    • DSC_0451_01.JPG
      DSC_0451_01.JPG
      112.4 KB · Views: 201
    • DSC_0458_01.JPG
      DSC_0458_01.JPG
      175.5 KB · Views: 204
    • DSC_0455_01.JPG
      DSC_0455_01.JPG
      113.2 KB · Views: 201
    autotrailer underframe
  • bernd lachmund

    Active Member
    As said before, I`ve taken some photos from the underframe wiring. There`s the regulator rod ( 1mm) from driving end to non driving end, led on scratch built brackets. And the handbrake wire (0,7mm) from driving end to middle V hangers.
    Finally I changed the cast regulator coupling bar from intended upright postion at the back left side ( where it wouldn`t have made any sense when coupled to a loco) to horizontal position by cutting off the brass rod at the end and after having drilled an 8mm hole in the end of the bar, replacing it by a horizontal fitted brass wire.
    Bernd
     

    Attachments

    • DSC_0468_01.JPG
      DSC_0468_01.JPG
      168.3 KB · Views: 132
    • DSC_0470_01.JPG
      DSC_0470_01.JPG
      200.5 KB · Views: 133
    • DSC_0471_01.JPG
      DSC_0471_01.JPG
      119 KB · Views: 133
    • DSC_0473_01.JPG
      DSC_0473_01.JPG
      106.3 KB · Views: 134
    • DSC_0475_01.JPG
      DSC_0475_01.JPG
      171.7 KB · Views: 133
    autogear coupling
  • bernd lachmund

    Active Member
    Hello,

    Jerry Colebrooke advised me the autogear coupling bar doesn`t belong at the driver`s end ( at least he`d never seen it there, he said) , so I changed the quite simple casting for the front by adding 3 more parts to make it a bit more prototypical. I drilled a 1mm hole in the "eye" of the coupling and fitted a small 1mm brass wire through it. Then I took a 2mm long, 0,8 mm thick wire , embedded it in a 0,8mm brass stripe and soldered the construction to the end("eye") of the casting. Finally, after having soldered 0,5mm wire to a 1 mm brass stripe, I drilled a 0,5mm hole into the middle of the whole construction and fitted the brass stripe with an eyelet in the 0,8mm wire/stripe construction.
    Sorry for my very imperfect English description! Maybe the photo makes it a bit understandable.
    Bernd

    PS
    Just corrected the "eylet" , I drilled a new hole closer to the 0,8mm wire
     

    Attachments

    • DSC_0478_01.JPG
      DSC_0478_01.JPG
      111.3 KB · Views: 91
    • DSC_0481_01.JPG
      DSC_0481_01.JPG
      132.1 KB · Views: 91
    • DSC_0483_01.JPG
      DSC_0483_01.JPG
      76 KB · Views: 88
    • DSC_0485_01.JPG
      DSC_0485_01.JPG
      79.8 KB · Views: 87
    Last edited:
    Top