4mm Workbench

ullypug

Western Thunderer
As I’ve explained on my Cheddar layout build, my layouts and most of my modelling stuff is presently packed in boxes pending a house move. Sadly this is taking an age, so I’m trying to keep my hand in with whatever I can do on a temporary set up.

So far, this has been limited to wagon kits, both in 4mm and whisper it quietly, 7mm. All very enjoyable but getting a bit monotonous. In a bid to mix things up a bit, I’ve dug out a High Level chassis kit for a 64xx GWR pannier tank. I’ve always liked the prototype though I’ve no evidence of any traversing the Cheddar valley branch. Westbury shed was home to numerous 54xx though, so I’m going to model one of these and make an assumption that somehow one found its way to my quiet corner of Somerset.

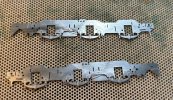
Gerry Beale explained how he carried out his conversion in MRJ 276 and I’ll use that as the blueprint, when I can find it… In the meantime, I’m just following Chris’ excellent instructions and have got the frames and rods assembled. So far so good.
 

Attachments

  • IMG_7570.jpeg
    IMG_7570.jpeg
    537.3 KB · Views: 14
  • IMG_7571.jpeg
    IMG_7571.jpeg
    341.8 KB · Views: 13
  • IMG_7572.jpeg
    IMG_7572.jpeg
    392.4 KB · Views: 11
  • IMG_7577.jpeg
    IMG_7577.jpeg
    370 KB · Views: 13

Dave Holt

Western Thunderer
Looking good so far. Chris does make rather good kits, doesn't he? I built one of his 57XX chassis (in EM), which was a treat to build and ran beautifully.
What for of suspension does your chassis have? Can't see any beam pivot holes, so is it CSB?
Nice to see you returning to the proper scale.:D
Dave.
 

ullypug

Western Thunderer
Looking good so far. Chris does make rather good kits, doesn't he? I built one of his 57XX chassis (in EM), which was a treat to build and ran beautifully.
What for of suspension does your chassis have? Can't see any beam pivot holes, so is it CSB?
Nice to see you returning to the proper scale.:D
Dave.
Thanks Dave. It’ll be compensated. Twin beams on the rear 2 axles and pivoting front axle as per the instructions, primarily due to the fact that (you’ve guessed it) I can’t find my CSB jig anywhere.
The beam pilot hole is mid way between the axles. It’s very small in 4mm
 

Captain Kernow

Western Thunderer
I found the twin-beam system worked very well when I did my 74XX a few years ago. I think Chris has adopted twin-beam compensation as standard for all of his chassis, where that is appropriate due to wheel arrangement. What is interesting to me is that one of his (presumably) earlier chassis - that for the Jinty - is designed for single beam compensation.
 

ullypug

Western Thunderer
Had a great weekend at Expo EM a couple of weeks ago and although we’re still waiting for the house move, I have managed to do a little bit of modelling. Currently on the shelf of incompleteness are a couple wagons, a couple of Geen Whitemetal Y2 kits and a Blacksmith O13 milk brake.
On the bench at the moment is a Blacksmith toplight which is destined to be a centre car for the GW twin railcar set. I haven’t built a bogie coach kit before but I’m enjoying this one.IMG_8112.jpegIMG_8683.jpegIMG_8682.jpegIMG_8681.jpeg
 

ullypug

Western Thunderer
So I’m at the stage where the basic body is built and battery boxes are in. I don’t seem to have any queen posts in the kit. Any suggestions on what is suitable for a C31 all third? The GWR coaches website has a picture of one after conversion to a camping coach and it seems like a flat fronted affair, maybe angle. My Russell books are in storage at the moment.

image.jpg
 

Bulldog3444

Active Member
Andrew,

I agree that for a C31 it would be the adjustable tapered queenposts, at 6'0" spacing I think.
It might be worth you while contacting Mark Seward who now markets Blacksmith coaches to see if he could supply you with the missing queenposts.

Ian
 

ullypug

Western Thunderer
Andrew,

I agree that for a C31 it would be the adjustable tapered queenposts, at 6'0" spacing I think.
It might be worth you while contacting Mark Seward who now markets Blacksmith coaches to see if he could supply you with the missing queenposts.

Ian
Thanks Ian
 

ullypug

Western Thunderer
One of the projects on my round tuit list has been the conversion of the rather lovely Rapido B sets to P4.

Having gained inspiration at the local EM Gauge area group meeting earlier in the week, I first tried something Bernie Baker had done on the Bachmann LNWR coaches, namely cutting through the stretcher at each end of the bogie and drilling through the pin point bearing (actually the electrical pick up for the carriage lighting). Sadly this didn’t work so I had to continue with the original plan. This was to use Bill Bedford sprung bogies and add cosmetic side frames.

The Rapido bogies are just too narrow to get replacement wheels in. An irritation which other manufacturers seem to have managed to get round.

The replacement bogies were made up as per the instructions without difficulty, taking time to ensure all folds were square. I use a hold and fold for this and once soldered together they are nice and rigid. I had a stash of Branchlines black beetle wheels for this and once I’d primed and sprayed the bogie frames the wheels were fitted without difficulty.

I decided I’d try to use the existing Rapido bogie moulding so once I’d removed the tie bars (which are upside down anyway) I cut through the transverse bolster just at the back of the frame. This releases the lower springs stretcher which needs to be cut in half to account for the additional width.

Then it’s simply a case of putting things back together, using pieces of plasticard (8.0mm x 5.0mm and 2.5mm thick - I used two layers of black 40 thou and 1 layer of white 20 thou) to pack out the bogie frame and provide a base for glueing the original bits together, not forgetting to reverse the tie bar.

The existing bogie frame needs a bit of filing to allow clearance for the waisted bearings. I didn’t quite get the two sides lined up but didn’t notice until later.

I added a packing piece of 24.0 x 8.0mm 40 thou across the top to act as a bearing plate.

I still need to make a short collar so I can reuse the existing retention screw without shortening the bogie pin but it’s looking ok to me.

As always, pictures explain things better than words.

One bogie is done and the other is left for the time being. I’m planning on doing the rest if I get time at the Wells show this weekend. Brakes still to be added obviously.

I can then sort the glazing bars and add a few passengers.

IMG_9727.jpegIMG_9729.jpegIMG_9732.jpegIMG_9733.jpegIMG_9734.jpegIMG_9735.jpegIMG_9736.jpegIMG_9737.jpegIMG_9739.jpegIMG_9742.jpegIMG_9743.jpegIMG_9745.jpegIMG_9746.jpegIMG_9747.jpegIMG_9748.jpeg
 

AJC

Western Thunderer
Interesting, and obviously an approach that works. I don't know what the 'scale' width over the outer faces of these GW bogies is meant to be - but a great many 4mm carriage bogies are overwidth. Of course, there are plenty of RTR models - both versions of the Warwell, for example), with underwidth bogies, so who knows?

Whatever, since the Rapido wagons I've encountered take a 26mm axle, I'm slightly surprised that this isn't part of their design standards, but whatever, it is not the end of the world, of a bit of a fiddle to resolve and a much better model than the venerable Airfix offering.

Adam

PS - enjoy Wells, I shan't be there this year, up in Norfolk!
 

ullypug

Western Thunderer
Earlier this month I spent a very enjoyable weekend at Railwells and managed to complete the remaining bogies using the same method as before.
Now with the tinking table temporarily reinstated in the garage, I’ve managed to finish off the coaches. First the roof was removed without drama, by gently prising up from one end. I then removed the guards compartment windows by inserting a chisel blade underneath the plastic glazing and twisting until the glue gave way. You need to rob windows from the main compartment so it was a simple case of swapping over the glazing in 4 compartments with the open position spares supplied with the model.

I cut the robbed out full length windows down with a Zuron track cutter and used them to fill the guards compartment, these being secured with Klear.
Correct grilles from Blacksmith were glued in place behind and passengers added. I got these off Amazon and am not bothered about them being HO and a bit garish as I’m not keeping the coach lighting.
I made a simple U shaped bar coupling from 0.9mm nickel silver wire which is set into a hole on 1 coach and engages in the recess under the bogie on the other. I might try to keep the NEM pocket for the supplied tommy bar on the next set I do.
Finally vacuum and steam hoses were added, with safety chains and coupling hooks.
All that remains is to blacken the wheels, add a tail lamp and weather the coaches.
The coaches attracted a lot of comments at Wells with a number of alternative suggested conversions being made. One suggestion is to use spare Hornby 7ft bogies off their corridor stock as these are wider.
One of our EM group has done a conversion with replacement EM wheels being dropped in with a bit of filing of the bogie frame and this might also be possible using Exactoscale P4 wheels since these have scale width tyres.
All in all though, I’m pleased with how this has turned out. I’ve 2 more sets to do and I’m going to try changing the 7ft bogies over to 9ft ones to create an E145 set next. The last one will need to wait until I can get some more 7ft Bill Bedford sprung bogies.
IMG_0136.jpeg
IMG_0137.jpeg
IMG_0139.jpeg
IMG_0140.jpeg
IMG_0142.jpeg
IMG_0144.jpeg
IMG_0146.jpeg
IMG_0151.jpeg
IMG_0152.jpeg
 

ullypug

Western Thunderer
Having converted the Rapido diagram E140 B set to P4 in my previous blog entry, I have been converting another set to the similar diagram E145. The coaches are virtually identical, the only real difference being the use of a 9ft bogie.

As the Rapido coaches only have a 7ft bogie, it’s a straight replacement with whatever takes your fancy. These could be modified or rewheeled RTR offerings but in my case I stuck with my preferred Bill Bedford sprung units and 9ft plate white metal sides from MJT.

These were made up in the usual way, the sprung units being sprayed before final assembly and the side frames filed with a slot to allow the pin point bearings to move up and down.

The major modification is obviously the bogie pin as the wheelbase requires these to be 2ft closer together for the 9ft bogies. Each pin has to be moved 4mm inwards.

The base of the coach is held with 6 small screws and once removed, the coach base drops out. There are 4 steel weights which are removed and then a small pilot hole was drilled at the appropriate location. The existing pin and adjacent ribs were cut off (after taking a deep breath) and a 8BA bolt inserted as the new pin.

I didn’t worry about the lighting strips on the coach body floor as the replacement bogies will render it superfluous as they don’t have the pick ups.

The sprung unit had a 1mm packing piece of plasticard laid on the top and then was attached to the pin with a couple of spacing washers before being secured with a nut and washer in the underside.

As you can see from the photos, the sloping end of the bogie side plate does not clash with the truss rods as per the prototype. I can play around with ride height if I need to.

I have had to remove the dynamo and guard steps as these clash with the bogies. I’ll need to fish out my Russell books to see where these should be attached or compromise if I have to!

The brake compartment grills and windows have been changed and passengers added as per the previous E140 conversion.

At some point I will need to re-number these coaches to suit and I’ve yet to add couplings, hoses and hooks, but for now that’ll do. I’ve proved to myself that the conversion is doable.
IMG_0703.jpeg
IMG_0704.jpeg
IMG_0705.jpeg
IMG_0706.jpeg
IMG_0707.jpeg
IMG_0712.jpeg
IMG_0713.jpeg
IMG_0725.jpeg
IMG_0726.jpeg
IMG_0727.jpeg
IMG_0728.jpeg
 

ullypug

Western Thunderer
In between finishing off the E145 B set, I’ve been making a pair of GWR beetles, or prize cattle wagons to give them their official names.

I have long had a picture of a goods train on the Cheddar branch which had an unusual wagon in its consist. It looked suspiciously like the Beetle in the Parkside kit I had but it had 6 wheels.

Well a little research later and I discovered that the GWR did indeed have a 6 wheel beetle, diagram W17, very similar in all other purposes to the diagram W7 4 wheel version represented by the Parkside kit.

I like both diagrams so decided to batch build one of each.

The Diag W7 is built as per Parkside kit instructions, but uses Bill Bedford spring axles and Exactoscale axle boxes and springs.

The 6 wheel version uses the W irons from Bill Bedford also, but the centre axle is a 2mm tube with 0.45mm wall which slides over a 1mm diameter Exactoscale axle. Can’t claim any credit for the idea, it’s one I picked off Mark Tatlow.

The only difference is I set the base of the kit upside down and slightly higher up to allow me to solder the W irons to a copperclad base.

I managed to keep the springs and J hangers from the kit and used MJT ones for the centre axle.

Photos show the state of play. Still plenty of details to add but we’re getting there.

IMG_0869.jpeg
IMG_0868.jpeg
IMG_0862.jpeg
IMG_0844.jpeg
IMG_0805.jpeg
IMG_0804.jpeg
IMG_0803.jpeg
IMG_0779.jpeg
IMG_0778.jpeg
 

AJC

Western Thunderer
Nice! I’ve occasionally hankered after one of those six wheelers. The brakes are basically the same as the milk tanks, I think… EDIT: so yes, reworked Rumney bits are possible. No, I’m not doing that, not soon, anyway!

Adam
 
Last edited:

ullypug

Western Thunderer
One of the frustrations over the last few years has been the unavailability of the majority of my modelling tools and materials, due to them being in storage pending house moves and the building of long term railway rooms. A few things have got to the build stage but nothing's been finished yet.

Happy to report some of that has changed, namely I've brought a few boxes out of storage and most importantly that included the airbrush and my various boxes of paints. I've been able to set up my spray booth in the garage and moved a few things along a little bit.

Firstly are the pair of beetles previously noted. These have been painted in BR maroon and just need a dose of weathering to tone everything down.
Another beneficiary is the diagram O13 milk brake which has been painted in BR crimson with transfers from CCT. At this stage of its life, it would probably have had plated ends but I won't tell anyone if you don't.

A mixture of vans include two Green Y2 fruit wagons await transfers. These were just about gone by 1951 so will be finished in a pretty decrepit state.

Lastly there's the Blacksmith diag C31 all 3rd toplight I bought at Wells last year. This has been ongoing for a while but has now been painted, lined and interiors fitted. Just the roof, corridor connections, axle boxes and numbering... This has taken a while and I really admire those builders who can turn a coach out in a week. This has taken ages. I've got the original kit's bogies on for now but will spring with Bill Bedford etc if necessary. It'll be used as either the centre car for the twin set or a trailing coach for the single railcar. Or both. But not at the same time. That would be silly.
IMG_1603.jpeg
IMG_1599.jpeg
IMG_1598.jpeg
IMG_1591.jpeg
IMG_1592.jpeg
IMG_1593.jpeg
IMG_1596.jpeg
IMG_1597.jpeg
IMG_1595.jpeg
 
Top